 Save
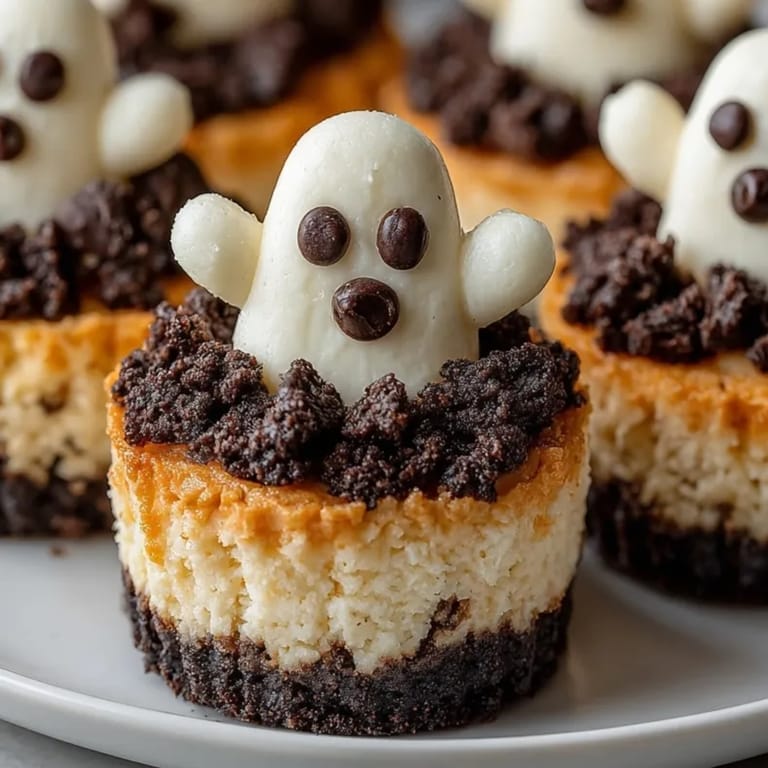
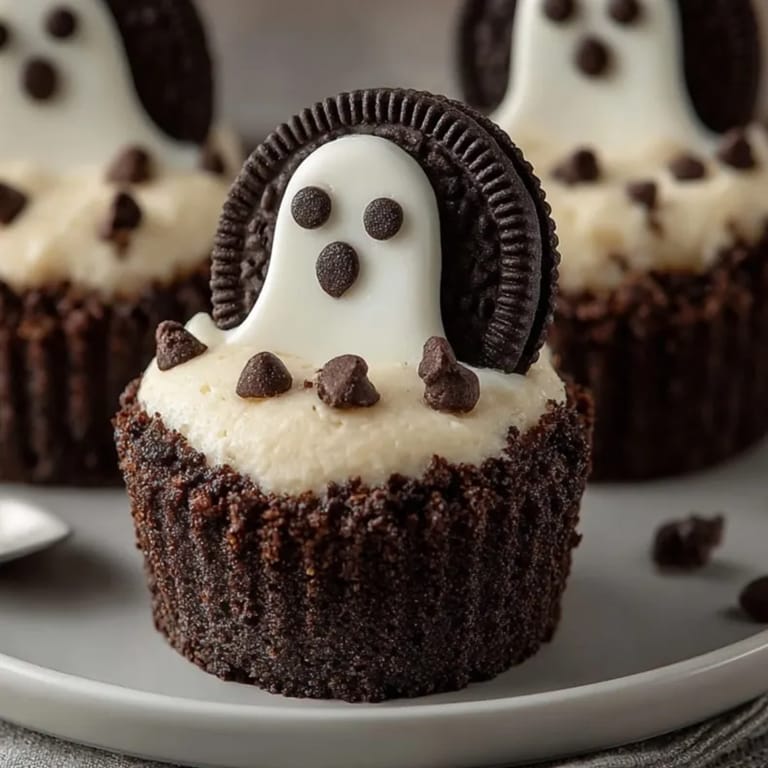
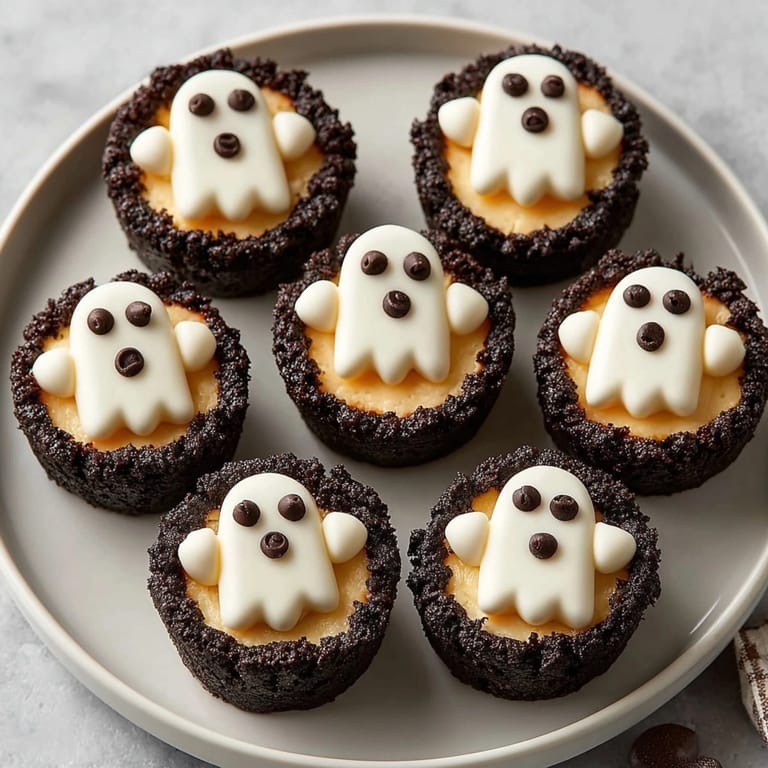
Save Mini Ghost Cheesecake Cups bring the festive spirit of Halloween to your dessert table with bite-sized rich and creamy cheesecakes sitting atop chocolate cookie crusts. Each one is topped with a homemade white chocolate ghost that is guaranteed to delight kids and grownups alike. These are perfect for parties and any fall gathering where a playful treat steals the show.
I love whipping these up with my niece the day before Halloween. The decorating always turns into laughter and a surprising ghost face or two
Ingredients
- Chocolate sandwich cookies: bring a chocolate crunch and hold up well as a crust. Choose a brand with deep cocoa flavor for extra richness
- Unsalted butter: melds the cookie crumbs together and gives a tender bite. Use high-quality butter for the best taste
- Cream cheese: creates the luscious creamy filling. Make sure it is softened to avoid lumps in your batter
- Granulated sugar: sweetens just enough without overpowering the tang of cream cheese
- One large egg: binds the filling for perfectly set cheesecake cups
- Vanilla extract: adds classic warmth to balance the tanginess
- Sour cream: provides extra silkiness and a hint of tartness. Full-fat is best for texture
- A small pinch of salt: balances flavors and brings out the chocolatey notes
- White chocolate: forms the sweet creamy ghosts on top. Look for real cocoa butter and avoid waxy candy melt substitutes unless necessary
- Mini and regular chocolate chips: complement the decorations perfectly. Opt for ones with smooth surfaces for precise little eyes and mouths
Tired of Takeout? 🥡
Get 10 meals you can make faster than delivery arrives. Seriously.
One email. No spam. Unsubscribe anytime.
Instructions
- Prepare the Pan:
- Line a 12-cup mini muffin tin with paper liners. This keeps each cheesecake easy to remove and makes cleanup quick
- Make the Crust:
- Combine finely crushed cookies and melted butter in a bowl. Mix until all crumbs are coated and you have a sandy texture that holds together when pressed
- Form the Crusts:
- Spoon about one tablespoon of crumb mixture into each paper liner. Press firmly with a spoon or your fingers so each base is compact and even
- Bake the Crusts:
- Place the tin in a preheated oven at 160 degrees Celsius. Bake for five minutes until slightly set. Let cool in the tin to keep the crust stable
- Mix the Cheesecake Filling:
- In a large bowl, beat softened cream cheese with sugar using an electric mixer until the mixture is perfectly smooth and fluffy
- Add Remaining Filling Ingredients:
- Blend in the egg, vanilla, sour cream, and salt. Mix just until everything is unified—overmixing can make the cheesecakes crack
- Fill the Cups:
- Divide cheesecake mixture evenly over the baked crusts. Use a heaping tablespoon for each and gently smooth the tops
- Bake the Cheesecakes:
- Return pan to oven and bake for 13 to 15 minutes. Cheesecakes should look set around the edges and gently wobble in the center
- Initial Cooling:
- Let cheesecakes cool right in the tin for about twenty minutes. This slow cool helps prevent sinking and cracking
- Chill the Cheesecakes:
- Transfer cooled cheesecakes to a wire rack and chill in the refrigerator for a minimum of forty-five minutes so the texture firms up before decorating
- Melt the White Chocolate:
- In a microwave-safe bowl, melt the white chocolate in twenty-second bursts, stirring each time, until creamy and smooth with no lumps
- Shape Your Ghosts:
- Using a spoon or piping bag, dollop the melted white chocolate onto each chilled cheesecake, forming a round ghost with a trailing tail for personality
- Add Eyes and Mouths:
- While chocolate is still soft, gently press mini chips for eyes and halved regular chips for little open mouths
- Final Chill:
- Let the decorated cheesecakes chill until the chocolate ghosts are completely set and firm to the touch
 Save
Save Chocolate sandwich cookies are always my favorite—they never lose their crunch and the flavor pairs with cream cheese like a dream. Nothing beats the moment my little cousin popped one in her mouth and announced it tasted just like a bakery treat
Storage Tips
Arrange cooled and decorated cheesecakes in a single layer in an airtight container. Store in the fridge up to three days. For longer keeping, freeze undecorated cheesecakes and finish with chocolate ghosts after thawing
Ingredient Substitutions
Swap white chocolate for vanilla candy melts if you prefer a sweeter topping. Feel free to use gluten-free chocolate cookies for a wheat-free version. Greek yogurt can replace sour cream in a pinch
Serving Suggestions
Display cheesecakes on a dark platter surrounded by Halloween-themed candies. They look great stacked in a tiered stand for party tables. Try offering a raspberry sauce or caramel drizzle for extra fun
Cultural and Historical Context
Mini cheesecakes became popular in American bake sales for their convenience and charm. Halloween-themed desserts have long been a tradition as families gather to celebrate fall and creativity in the kitchen flourishes
Seasonal Adaptations
Use pumpkin spice cookies for a fall-inspired crust Shape ghosts with orange-tinted white chocolate for unique effect Decorate with edible gold glitter for added magic
Success Stories
These have caused a stir at every office gathering. Kids love them and adults sneak seconds. My mother-in-law always asks for a tray for her book club in October
Freezer Meal Conversion
Flash freeze cooled plain cheesecakes individually and package tightly. Thaw overnight in the fridge and decorate with chocolate ghosts fresh before serving
 Save
Save Mini Ghost Cheesecake Cups are sure to be the highlight of your Halloween dessert table. Share these playful treats and watch everyone reach for seconds
Recipe FAQ
- → Can I use different cookies for the crust?
Yes, feel free to swap chocolate sandwich cookies with graham crackers or chocolate wafer cookies for a different base flavor.
- → How do I ensure smooth cheesecake filling?
Use softened cream cheese and mix ingredients gently but thoroughly to avoid lumps. Don't overmix after adding the egg.
- → Is chilling the cheesecakes necessary?
Chilling helps the filling set and develop its creamy texture, making it easier to decorate and serve.
- → Can these be made ahead?
Absolutely. Make them a day before and store in the fridge. Add the ghost decoration before serving for best results.
- → What if I don't have piping tools for ghosts?
Use a spoon to drop white chocolate onto each cup, then shape with the back of the spoon for a rustic ghost look.
- → Can I substitute white chocolate for decoration?
Vanilla candy melts work as a substitute and can be colored if desired.
- → How do I store leftovers?
Store in an airtight container in the refrigerator for up to 3 days. Enjoy them chilled.