 Save
Save I'll never forget the Halloween party when my neighbor brought this creepy skull spread, and suddenly all the kids stopped running around the yard to huddle around the appetizer table. The combination of that smooth, tangy cream cheese base with the colorful vegetables arranged into a grinning skull was so delightfully mischievous, so perfectly Halloween, that I knew I had to master it myself. There's something magical about turning simple ingredients into edible art that makes people smile before they even taste it.
I made this for my daughter's classroom Halloween party last year, and watching her beam with pride when her classmates gathered around to admire her mom's creation—before devouring it completely—reminded me that the best party food isn't about being complicated. It's about bringing a little joy and a little spooky fun to the table.
Ingredients
- Cream cheese, softened: This is your canvas, and using cream cheese that's actually soft makes spreading it so much easier. Cold cream cheese will fight you every step of the way, so leave it out for 30 minutes beforehand
- Sour cream: Just a couple tablespoons keeps things creamy and adds a subtle tang that makes people ask what's in it
- Garlic powder and lemon juice: These transform plain cream cheese into something savory and sophisticated, though completely optional if you prefer a milder flavor
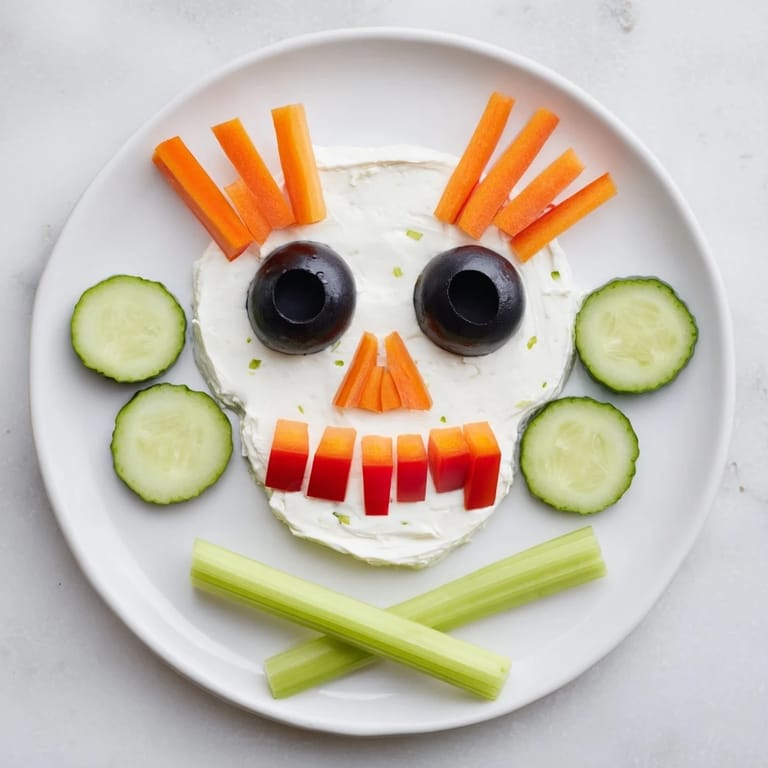
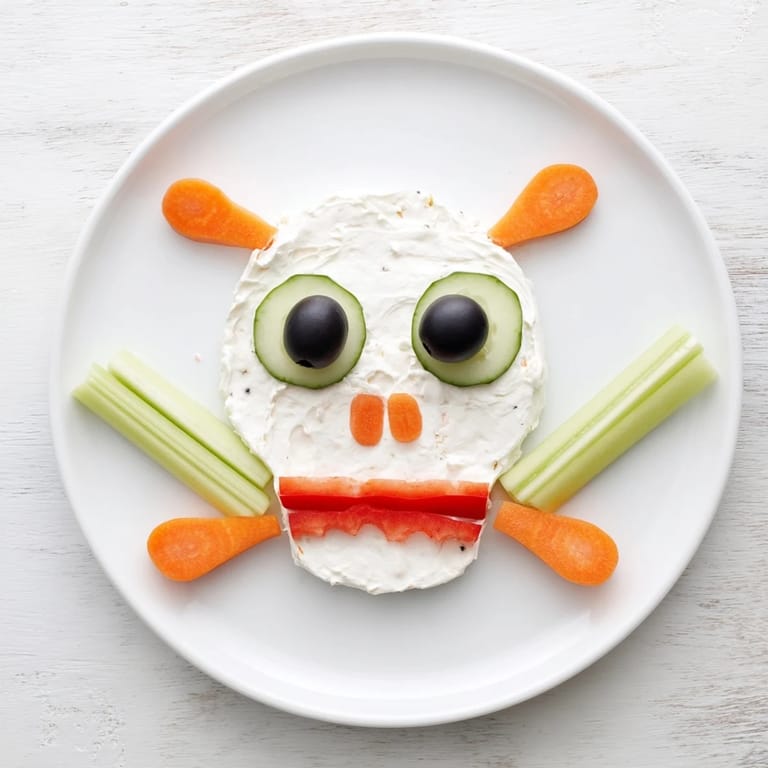
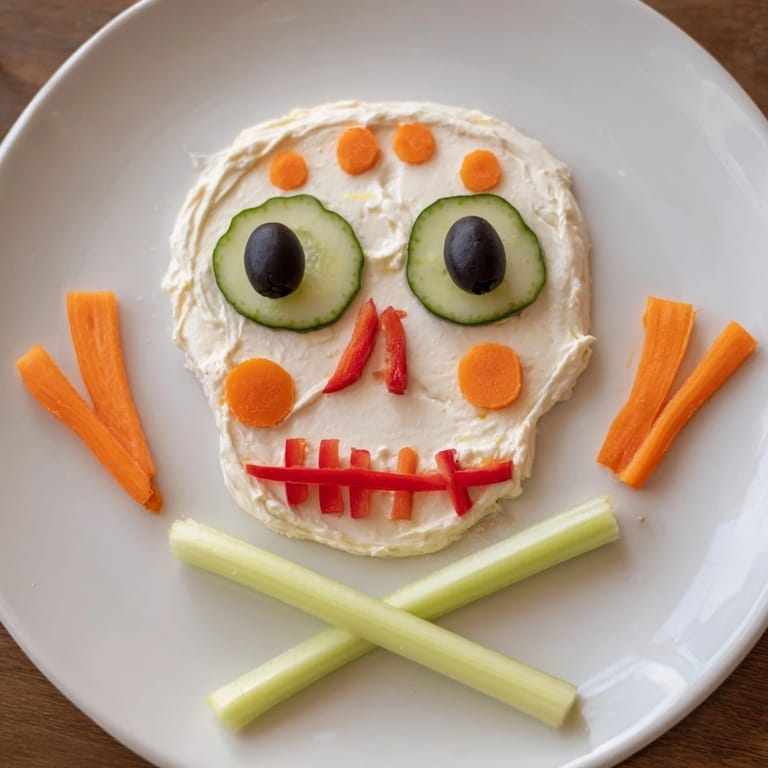
- Black olives for eyes: They're already the perfect size and color, so don't overthink this part
- Red bell pepper strips: These become the cheerful mouth and add a sweet crunch that contrasts beautifully with the creamy spread
- Carrot rounds and celery sticks: The carrot slices become teeth and the nose, while celery or breadsticks form those dramatic crossbones underneath
- Cucumber slices: These add a cool, refreshing crunch and fill in empty spaces to make the skull look fuller and spookier
Tired of Takeout? 🥡
Get 10 meals you can make faster than delivery arrives. Seriously.
One email. No spam. Unsubscribe anytime.
Instructions
- Mix your creamy base:
- In a bowl, combine your softened cream cheese with the sour cream, garlic powder, lemon juice, salt, and pepper. Blend them together until everything is smooth and you don't see any lumps. This is where you develop your flavor, so taste as you go and adjust the seasonings until it feels right to you
- Create the skull shape:
- On a large platter, use a spatula or the back of a spoon to spread the cream cheese mixture into an oval shape that resembles a skull. Take your time smoothing it out and creating distinct edges, almost like you're sculpting. This is the fun, messy part where you get to play with your food
- Build the crossbones:
- Take those celery sticks or breadsticks and arrange them in an X shape underneath the bottom of your skull. This creates that classic pirate flag look and adds real visual drama to your spread
- Place the eyes and nose:
- Cut your black olives in half and position them where the eyes should be, pressing them slightly into the cream cheese so they stay put. Take a small carrot piece or olive slice and center it for the nose. These details give your skull its personality
- Design the mouth and teeth:
- Arrange your red bell pepper strips in a curved line to form a grinning mouth, then use carrot rounds to create spooky teeth along the bottom. This is where you can get creative and make your skull smile or grimace
- Fill in the details:
- Use cucumber slices and any remaining vegetable pieces to complete the face and add color contrast. Scatter them around the skull to create texture and visual interest
- Final touches:
- If you're using fresh parsley or chives, sprinkle them lightly over the skull for a pop of green. Serve it chilled alongside crackers, pita chips, or extra vegetable sticks for people to use as scoops
 Save
Save There was something unexpectedly touching about watching my friend's elderly mother, who usually doesn't eat much at parties, asking for a second helping of this spread and sharing a memory of carving pumpkins with her grandkids. Food is never just food when it carries that kind of joy and memory with it.
Make It Your Own
This recipe is genuinely a blank canvas for your creativity. If you want to make it herbed, stir in fresh chives or dill into the cream cheese base before spreading. Some people add a touch of hot sauce or sriracha for a kick, others mix in sun-dried tomatoes or roasted garlic. The vegetables can be swapped based on what's in your fridge or what colors will look spookier. Orange bell peppers create a different vibe than red ones. Halved cherry tomatoes work for eyes if you don't have olives. The beauty is that as long as you keep that creamy base and maintain the skull shape, it's impossible to get wrong.
Serving Smart
Position your platter at eye level on the party table, because this is meant to be admired before it's devoured. People tend to eat with their eyes first, and the presentation is half the fun. Keep it toward the cooler side of your table or use a shallow bed of ice underneath to keep the cream cheese from softening too much. I've also found that setting out small plates and napkins nearby prevents people from just grabbing handfuls and making a mess, though honestly, a little chaos is part of the party atmosphere.
Storage and Make-Ahead Tips
You can prepare the cream cheese mixture up to two days ahead and store it in a covered container in the fridge, which means you're really only 10 minutes away from assembly on party day. Slice your vegetables in advance too if that helps you stay sane the morning of your event. The only thing you should assemble fresh is the actual skull on the platter—that way everything looks vibrant and the vegetables maintain their crunch. This is the kind of appetizer that gets better the more you make it, because you learn your own style and speed.
- Prep vegetables the morning of, store them in water-filled containers so they stay crisp and hydrated
- Make the spread mixture a day or two ahead—it actually tastes better when flavors have time to get friendly with each other
- Assemble no more than 2 hours before serving so vegetables stay fresh and the spread stays firm
 Save
Save This recipe taught me that the most memorable party moments often come from the simplest, most joyful touches—a skull made of cream cheese and vegetables that makes people smile. That's the real magic right there.
Recipe FAQ
- → What ingredients create the creamy base?
The base is made by blending cream cheese, sour cream, garlic powder, lemon juice, salt, and pepper until smooth.
- → How are the skull features formed?
Black olives serve as eyes, carrot slices form the nose and teeth, and red bell pepper strips shape the mouth.
- → What can be used to represent the crossbones?
Long celery sticks or breadsticks are placed crossed beneath the skull shape to mimic crossbones.
- → Is there a gluten-free option available?
Yes, using only celery sticks instead of breadsticks makes the spread gluten-free.
- → How should the spread be served?
Serve chilled alongside assorted crackers, pita chips, or vegetable dippers for dipping.
- → Can extra herbs be added for flavor?
Absolutely. Fresh parsley or chives can be added for garnish and additional flavor.